Compatiblity:
![]()
![]()
Price:
FREE!
Upgrading
Download 30 day Test Drive Copy | Visit the Gallery
|
Compatiblity: |
|
|
Price: |
FREE! |
 |
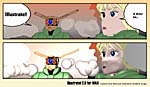
Introduction You're a 3D animator and need to produce 2D cartoon or technical illustrations from your work with a minimum of fuss. Illustrate! will revolutionize how you go about producing 2D animations and illustrations. Take advantage of the vast array of 3DS MAX modelling and animation tools to produce your work then let Illustrate! produce the final 2D illustrated image from your scene. Illustrate! will take your 3DS MAX scene and produce a 2D rendering that appears as though it was hand-drawn. Objects are drawn in a flat color with the edges drawn using a brush, stroke, and paint of your choosing. The numerous options allow you to produce any style of illustration. Cartoon and comic book style output is automatic. Load your scene then press Render. |
 |
Complex technical illustrations are just as easy with a multitude of options that give you precise control over the final output. Choose from different line-styles and include hidden-line removal to create accurate illustrations from your existing models. Work in any units you wish, including points, picas, mms, etc. Do you want to output to poster format? Change the output size and Illustrate! will scale everything automatically. Speed and simplicity were the driving forces behind the design of Illustrate!. The interface is extremely simple and layed out so everything is available with just one click. A unique interactive help system and the easy tutorials will get you up to speed in no time. The rendering engine incorporates proprietary techniques to ensure maximum speed while maintaining absolute accuracy. Image quality is assured with Illustrate!'s unique anti-aliasing method. Whatsmore you can use the FULL UNLIMITED version for 30 days for free! |
3DS Max 1.1 with the same memory and hardware requirements.
Illustrate! is designed to be as integrated as possible into the core 3DS MAX product. As such, it makes as much use of your existing knowledge as possible.
Art materials are the illustration equivalent of 3DS MAX Materials for photorealistic renderings. Art materials allow you define your own illustration styles that can be applied individually to each object. Below are the art materials available.
Style
The style defines the way in which each individual object will be drawn, much the way assigning a MAX Material to an object will determine how it is rendered.
Surface
Edges
All - includes all edges
Interior Outline - outline interior to the object
Exterior Outline - outline exterior to the object
MAX Defined - edges defined as visible by 3DS MAX
Material Change - edge where two faces have different materials
Brush
A brush essentially defines the footprint used to paint with. The brush dialog box allows for real-time editing of brush options. Change an option and you get direct feedback as to what the final brush will look like. The brush options are:
Shape
Image
Paint
Now that you've got your brush defined, dip it in some paint. The paint options are:
Color
Stroke
You now have the brush dipped in the paint. The next step is to specify how you are going to "dab" the brush along the edge. The stroke options are:
Spacing
Pattern
Canvas
Now you are ready to paint. But paint on what? This is where the canvas object comes into play. The canvas defines the "background" on which the illustration is drawn. It takes the background set in 3DS MAX(single color or environment map) and modifies it to produce a "textured" output.
Texture